 By Ron Beck, Outside Technical Advisor and Manager of Training for U.S. Boiler Company
A successful high efficiency, condensing boiler installation starts with proper planning and proper boiler sizing. Yes, this means you must complete a thorough heat loss calculation. I often ask in training seminars, “Is it more important to properly size a cast iron boiler or a modulating condensing boiler?” The correct answer is that it is equally important to properly size both. One main reason for this is lower water volume. Many responses to my question, however, is that cast iron is more important to size properly. If I had to choose, I would say high efficiency due to much higher standby losses. I then hear the same rebuttal, “But high efficiency boilers modulate!” Yes, they do, but they can still raise the water temperature too quickly and cause short cycling. In a optimal operation, the boiler should stay running on a demand from the thermostat until the demand goes away.
So, how do we achieve a trouble free installation? Here are a few tips.
- Proper sizing of the boiler.
This will allow for more accurate modulation, longer run times, better matching the heating needs and increasing the efficiency of the operation.
- Proper venting.
With the introduction of 10:1 turndown modulating boilers, it is vital to pay more attention to proper venting. The blower will be moving less air through the heat exchanger and not pushing products of combustion as far from the vent termination. Pay special attention to your venting and follow the Installation & Operation (I&O) Manual. Due to changing weather conditions, you may want to get more horizontal separation and possibly add some vertical separation of the vent and air intake terminations.
- Pipe the boiler per the I&O manual.
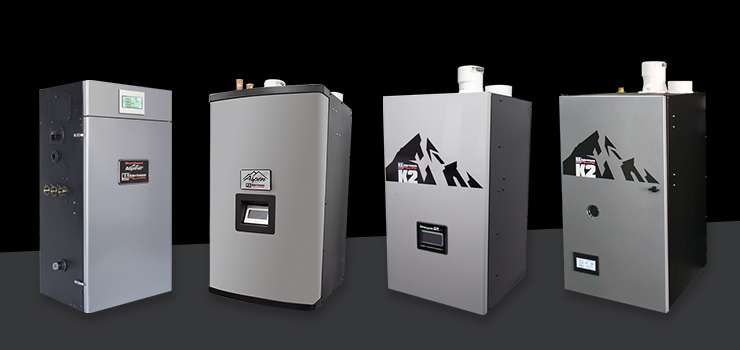
All U.S. Boiler watertube condensing boilers, which include the Alpine, K2 and K2 Combi, have higher resistance in the heat exchanger and require primary/secondary (p/s) piping. The Aspen has a firetube heat exchanger and does not require p/s piping, but is still a good practice. If you choose not to use p/s piping on the Aspen, you must verify you have the proper flow through the boiler at all times. To check the flow, lock the boiler on high fire and turn on the smallest zone. Press the status button and scroll to the right one screen. This will display the supply and return temperatures. ΔT is the temperature difference. Do the math and make sure the ΔT does not exceed 35°F. Again, I would suggest using p/s piping and sizing the boiler pump by using the chart in the I&O manual.
- The system piping may have to be a bit larger than the boiler piping.
Using the high efficiency boiler piping charts in the U.S. Boiler Heating Helper, size the system manifold accordingly. For example, if the condensing boiler is 150K, the boiler piping size will be 1”. To get 150K to the house at a 20°F, the system piping would have to be 1-1/4”. If piping with closely spaced tees, the tees would have to be 1-1/4” by 1-1/4.” Never install anything between the tees and keep them as close as possible.
- Utilize the Sage Zone Control.
To increase fuel savings, install U.S. Boiler Company’s Sage Zone Control (SZC). This control will limit the firing rate of the boiler to match the zone demand. As additional zones demand heat, the SZC will add all the demands and limit the fan speed. The means that the boiler will very seldom have to operate with the fan at maximum RPM’s. This will extend run times at lower BTU input. When programing the SZC on the boiler display, and the heat loss per zone is not known, program the zones according to pipe size as follows:
• 3.4” = 30,000
• 1” = 60,000
• 1-1/4” = 120,000 – 140,000
When you complete this process, go to the “Modulation Setup” menu and change the Zone Release Time from 15 minutes to 60 minutes. The next few suggestions can be done for higher, better cycle rates, but is not required. In the same menu, locate the DHW Max Expected rate and change to the input to match the required input for the IWH. Next, go to “Central Heat” and change the Response Speed parameter to number 1 (center number on display).
- Do a proper start-up.
Please note that if you are converting to LP, the Alpine boiler requires a throttle change on the gas valve. The K2, K2 Combi, and the Aspen require venturi changes. You will need to order the appropriate LP Conversion Kit for these boilers.
Check the incoming gas pressure to the gas valve. Verify it is above the minimum rating on the boiler label, even when other appliances are running. Next, with the boiler locked into high fire in the “Manual Control” menu, do your combustion test. Make sure to adjust the gas valve to achieve the proper O2 according to the I&O manual. Next, lock the boiler into low fire and adjust the low fire O2 so that it is slightly higher than the high fire O2. This is important! The low fire O2 must be equal to or greater than the high fire O2. I suggest having the low fire O2 a couple tenths higher than the high fire O2.
Ron Beck is Outside Technical Advisor and Manager of Training for U.S. Boiler Company, where he’s been since 1998. Ron’s 36 years of experience in the heating industry include climbing the ranks of aHVAC company, from apprentice to service manager. Ron can be reached at: RBeck@usboiler.net

